Build a multiplatform Cordova plugin for Android, iOS and Electron
Introduction
In this tutorial I’m going to show you how to setup a plugin, use native dependencies, return one or multiple responses for each request and add settings to native configuration files like AndroidManifest.xml. I learned to develop Cordova plugins by looking to the source code of other plugins. If you don’t find the solution you need here, I encourage you to do the same (or leave a comment 🙂). I will assume you already have some experience building Cordova apps and using Cordova plugins.
We are going to create every file by hand, but you could take a look to this tool too: plugman. I tried plugman, but I still prefer to create everything by hand, using a plugin template I created some time ago as a reference. Moreover, plugman creates iOS code in Objective-C instead of Swift.
You could find the source code of this tutorial on GitHub:
https://github.com/adrian-bueno/multiplatform-cordova-plugin-example.
Let’s start!
Base configuration
Create a new directory for your new plugin, I’m going to call it cordova-plugin-example.
Inside this new directory, create 2 more directories: src and www, and 2 files plugin.xml and package.json.
Optionally, you could create a README.md to describe your plugin and a .gitignore too.
📁 cordova-plugin-example
├── 📁 src
├── 📁 www
├── 📄 .gitignore
├── 📄 package.json
├── 📄 plugin.xml
└── 📄 README.md
Open plugin.xml and add the following content:
<?xml version='1.0' encoding='utf-8'?>
<plugin id="cordova-plugin-example" version="1.0.0"
  xmlns="http://apache.org/cordova/ns/plugins/1.0"
  xmlns:android="http://schemas.android.com/apk/res/android">

  <name>CordovaPluginExample</name>
  <description>Cordova plugin example</description>
  <license>MIT-0</license>
  <keywords>cordova, example, multiplatform, android, ios, electron</keywords>

  <!-- www -->

  <!-- android -->

  <!-- ios -->

  <!-- electron -->

</plugin>
We will add the specific platforms configuration later.
Open package.json and add:
{
  "name": "cordova-plugin-example",
  "version": "1.0.0",
  "description": "Cordova plugin example",
  "author": "<Your name>",
  "license": "MIT-0",
  "homepage": "<Your git repository>",
  "repository": {
    "type": "git",
    "url": "<Your git repository>"
  },
  "cordova": {
    "id": "cordova-plugin-example",
    "platforms": [
      "android",
      "ios",
      "electron"
    ]
  },
  "keywords": [
    "ecosystem:cordova",
    "cordova-android",
    "cordova-ios",
    "cordova-electron",
    "cordova",
    "android",
    "ios",
    "electron",
    "example"
  ]
}
Adapt the package.json to your needs. You could remove all the properties except name, version and cordova.
www
Inside this folder we are going to create a JavaScript file which purpose is to be the JavaScript interface between our web apps and native code.
Create the file www/CordovaPluginExample.js. Then we are going to define some methods/functions.
const exec = require('cordova/exec');

const PLUGIN_NAME = 'CordovaPluginExample';

// Returns the string "Hello {name}!"
exports.greeting = function (successCallback, errorCallback, name) {
  exec(successCallback, errorCallback, PLUGIN_NAME, 'greeting', [name]);
};

// Returns a number every second, from "seconds" parameter value to 0.
exports.countdownTimer = function (successCallback, errorCallback, seconds) {
  exec(successCallback, errorCallback, PLUGIN_NAME, 'countdownTimer', [seconds]);
};

// Writes a file in:
// - iOS: App Documents directory
// - Android:
//   - (Android 9-) Phone Documents directory
//   - (Android 10+) User can choose the directory
// - Electron: User's Documents directory
exports.writeFile = function (successCallback, errorCallback, fileName, text) {
  exec(successCallback, errorCallback, PLUGIN_NAME, 'writeFile', [fileName, text]);
};

// Returns current Bitcoin price
exports.bitcoinCurrentPrice = function (successCallback, errorCallback) {
  exec(successCallback, errorCallback, PLUGIN_NAME, 'bitcoinCurrentPrice', []);
};
As you have seen, methods have the following interface:
const exec = require('cordova/exec');

exports.myMethod = function (successCallback, errorCallback, arg0, arg1, arg2, argX, ...) {
  exec(successCallback, errorCallback, '<plugin-name>', '<method-name>', [arg0, arg1, arg2, argX, ...]);
};
Next, we are going to declare this new JavaScript file inside plugin.xml, beneath the www comment:
<!-- www -->
<js-module name="CordovaPluginExample" src="www/CordovaPluginExample.js">
  <clobbers target="cordova.plugins.CordovaPluginExample" />
</js-module>
The clobbers tag will bind our www/CordovaPluginExample.js code to an object in window.cordova.plugins.CordovaPluginExample. You could set the path you want, you could set just <clobbers target="CordovaPluginExample"/> and it will be available in window.CordovaPluginExample.
We are ready now to implement the native code.
I have splitted each platform implementation in a different tutorial to improve readability and the load of this page.
Android
iOS
Electron

Final plugin file structure
📁 cordova-plugin-example
├── 📁 src
│   ├── 📁 android
│   │    ├── 📄 build.gradle
│   │    ├── 📄 CordovaPluginExample.java
│   │    └── 📄 WriteFileHelper.java
│   ├── 📁 ios
│   │    ├── 📄 CallbackHelper.swift
│   │    └── 📄 CordovaPluginExample.swift
│   └── 📁 electron
│        ├── 📄 CordovaPluginExample.js
│        └── 📄 package.json
├── 📁 www
│    └── 📄 CordovaPluginExample.js
├── 📄 .gitignore
├── 📄 package.json
├── 📄 plugin.xml
└── 📄 README.md
Using the plugin in a Cordova app
Create an empty Cordova app
Install the Cordova CLI:
npm i -g cordova
Create your Cordova app:
cordova create <app-name>
Enter to the new app directory:
cd <app-name>
Add all the platforms needed:
cordova platform add android
cordova platform add ios
cordova platform add electron@4.0.0
# Or if you want to use my cordova-electron fork
cordova platform add https://github.com/adrian-bueno/cordova-electron#feature/keep-callback
Add the plugin that adds Swift support if you haven’t add it as a dependency in plugin.xml:
cordova plugin add cordova-plugin-add-swift-support
Install the plugin to test it
Install the plugin:
npx cordova plugin add <path-to-plugin>/cordova-plugin-example
Install the plugin by linking it (better for development, you don’t have to install it for every change you make):
npx cordova plugin add <path-to-plugin>/cordova-plugin-example --link
Remove the plugin:
npx cordova plugin remove cordova-plugin-example
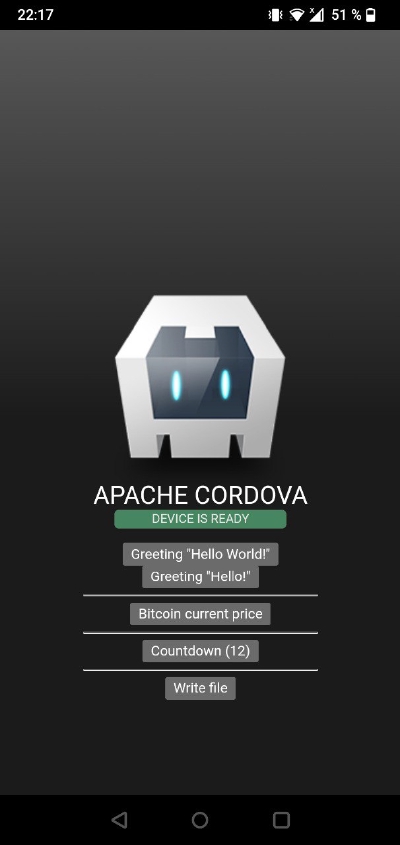
Add buttons to the HTML
Open www/index.html and add the following buttons:
<body>
  <div class="app">
    <h1>Apache Cordova</h1>
    <div id="deviceready" class="blink">
      <p class="event listening">Connecting to Device</p>
      <p class="event received">Device is Ready</p>
    </div>

    <!-- copy from here -->

    <br>

    <button id="greeting">Greeting "Hello World!"</button>
    <button id="greeting-empty">Greeting "Hello!"</button>

    <hr>

    <button id="bitcoin">Bitcoin current price</button>

    <hr>

    <button id="countdown">Countdown (12)</button>

    <hr>

    <button id="write-file">Write file</button>

    <!-- to here -->

  </div>
  <script src="cordova.js"></script>
  <script src="js/index.js"></script>
</body>
You should see this when you run the app:
Call the plugin from JavaScript
Open www/js/index.js and the buttons functionality:
Remember what did you add as
clobbersin yourplugin.xml. In my case, I added<clobbers target="cordova.plugins.CordovaPluginExample" />so now the plugin is binded to variablewindow.cordova.plugins.CordovaPluginExample.
// For this example, we will define a function
// for each plugin method.

// We will call the plugin and log the result in the console.


// The greeting funtion uses callback functions
// to log the results
function greeting(name) {
  function success(response) {
    console.log(response);
  }
  function error(code) {
    console.error(code);
  }
  cordova.plugins.CordovaPluginExample.greeting(success, error, name);
}

// We could return a Promise and use resolve and reject
// as the callback functions.
function bitcoinCurrentPrice() {
  return new Promise((resolve, reject) => {
    cordova.plugins.CordovaPluginExample.bitcoinCurrentPrice(resolve, reject);
  });
}

// The same as bitcoinCurrentPrice but with parameters
function writeFile(fileName, text) {
  return new Promise((resolve, reject) => {
    cordova.plugins.CordovaPluginExample.writeFile(resolve, reject, fileName, text);
  });
}

// The same as greeting
function countdownTimer(seconds) {
  function success(response) {
    console.log(response);
  }
  function error(code) {
    console.error(code);
  }
  cordova.plugins.CordovaPluginExample.countdownTimer(success, error, seconds);
}

// This helper function will simplify
// the binding of the click events of buttons
// with our previous functions
function bindClick(elementId, callbackFunction) {
  document
    .getElementById(elementId)
    .addEventListener("click", callbackFunction);
}

// We can only use Cordova plugins when the
// Cordova platform is ready, this function
// will be called when the "deviceready"
// global event is received
function onDeviceReady() {
  // This next 3 lines were generated by the Cordova CLI:

  // Cordova is now initialized. Have fun!
  console.log("Running cordova-" + cordova.platformId + "@" + cordova.version);
  document.getElementById("deviceready").classList.add("ready");

  // Now we can bind the funcions to the buttons
  // and see the results on the browser console
  // when a button is clicked

  bindClick("greeting", () => greeting("World"));
  bindClick("greeting-empty", () => greeting());

  bindClick("bitcoin", () => {
    bitcoinCurrentPrice()
      .then((res) => console.log(res))
      .catch((error) => console.error(error));
  });

  bindClick("countdown", () => countdownTimer(12));

  bindClick("write-file", () => {
    writeFile("cordova-plugin-example.txt", "Hello there 👋")
      .then((res) => console.log("File written"))
      .catch((error) => console.error(error));
  });
}

document.addEventListener("deviceready", onDeviceReady, false);
Debugging the native code
Android
To debug Android Java code, open platforms/android with Android Studio
and run the app with it.
To view web layer logs, enable USB debugging in your Android phone. Then open: chrome://inspect/#devices. The app must be runnning to appear in this page.
iOS
To debug iOS Swift code, open platforms/ios with Xcode and run the app with it.
To view web layer logs, enable Developer Tools in Safari and select your iOS device from this new menu. The app must be runnning to appear in this menu.
Electron
I don’t know yet how the Node.js code could be debugged (other than using console.log).
Useful references
- Plugin development guide
- plugin.xml documentation
- config.xml documentation
- Android platform documentation
- iOS platform documentation
- Electron platform documentation
@awesome-cordova-plugins (formerly @ionic-native)
You could develop the @awesome-cordova-plugins wrapper too,
to simplify your Cordova plugin interface by using Promises
and Observables instead of callback functions.
